Just sharing some additional P10 experiences I’ve had in 2024. Hopefully it will either be useful or you will never need to know it. Either of which is perfectly ok, but if you’re here, you may need it.
Managed System(s) in “Recovery” status
While installing 15 S1022s, (Firmware 1050.x) a few months back, three of them came up in the “Recovery” state to the HMC. I personally had never seen or experienced this. The common denominator on these three is they were initially powered on manually (via the power button), not via the HMC. Unsure how or why exactly that matters , and since then I believe I saw a firmware, or maybe it was HMC, bug description that sounded similar to this issue maybe it won’t be an issue any longer.
Initially I thought it was a bad result of connecting to HMC not high enough to support the system. But I had 10 initially connected to HMC 1030, and the other 5 were connected to HMC 1050. However, we had two of the 10 error, and one of the 5 so that shouldn’t have been it. Again the only known common denominator was they were powered up manually, regardless of HMC level.
But then when HMC level was rectified, powering on the the other 12 came on just fine. Those 12 never had an error before during or after. Which is strange because none of the 15 ever really established a valid connection, yet were seen by the HMCs. Just the ones that powered on initially got corrupted some how. I would think corrupting the firmware is a bit harsh for the situation. But as much as I think I’m special on corrupting stuff, I’ve come to realize this problem isn’t unique to me.
For the three in the “Recovery” state I found this procedure :
https://www.ibm.com/docs/en/power9?topic=hmc-recovering-partition-data-managed-system
Yet in this case it doesn’t apply/can’t be used because they are new, never been seen by HMC so no backup data on the HMC to recover from. So the only other method is to reset system settings via BMC port. This does wipe out all partition data, but other than the pesky service partition we have nothing to lose anyway. The procedure is listed at the end of this section. But I also want to share other problem instances that this procedure has become the magic cure all.
I since have remembered reading a situation from Jaqui Lynch where a system came in some default factory build mode and it too had to be reset. Leading to a similar “recovery” set of steps.
Connection Failed, Firmware corrupted
In late August 2024, we had 2 of 3 L1022s that also had to be factory reset. After initial connection, power on, password, did the VMI, then later the eBMC (ASMI) showed no connection (or connection failedl I don’t really remember which one). At some point we encountered a, Firmware was corrupted, message and needed to be reloaded. This same reset did appear to fix it.
New E1050 Power On failure
Late September, new install with HMC v1060 and system firmware level 1060.x we had one of eight E1050s that wouldn’t power on. After about ~3minutes it would hit just display if failed to power on. It powers up, ramps up the fans, for ~40 seconds, fans spin down quickly and shuts down to standb. It then waits ~20 seconds, then it tries again. This occurs three times. The last time it just turns on the LED, keeps the fans up high, and leaves it in the error state.
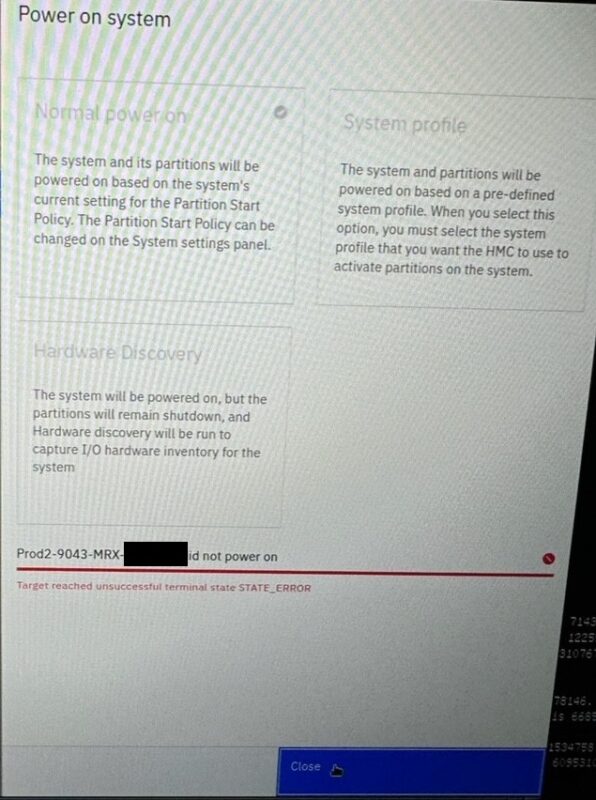
I don’t know a good reason to leave it running that way so I told it to power off. I unplugged for 10 minutes, tried again, same result. I unplugged, popped open the lid, with gloves lightly pressed down and around to see if I could find anything obviously loose, and nothing. Though I could hear and see all four fans working, and they were installed onsite, I thought man is one of them not making a good connection. But nope, that’s not it. After engaging support, it too appears this same reset procedure fixed it. I can’t say I expected that to be the resolution.
The reset procedure was:
1. Login to the ASMI
2. Power Off server
3. Go into settings, reset server settings
4. There are two options:
a. Reset server settings: Resets the server settings only.
b. Reset BMC and server settings: Resets both the server and the BMC settings.
5. Select – a. Reset server settings only
6. Under power settings make sure it is set to user initiated (standby)
7. Check LMB is set to 256MB
8. Log out of ASMI
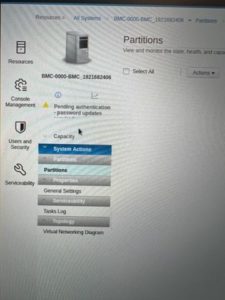
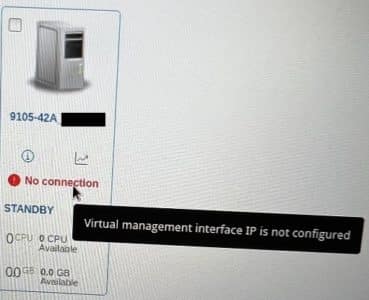
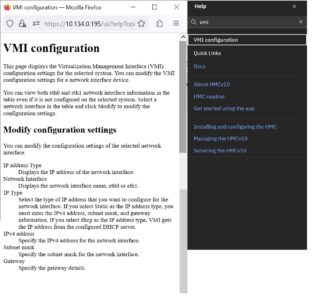
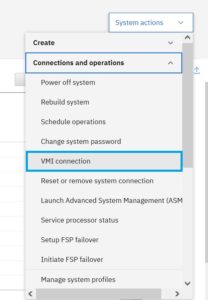
9. Go to the HMC GUI
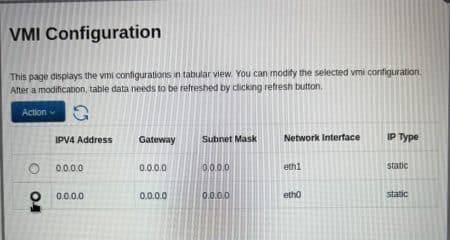
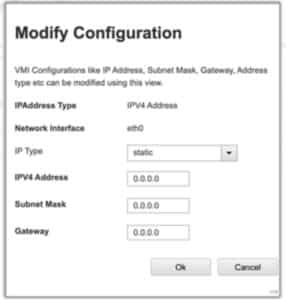
10. Reconfigure the VMI
MISC Factory Inconsistencies
Adapter placement
On occasion we are getting I/O cards not placed in the adapter placement recommended best practices order. I’m not saying I’m moving cards on every install, but it is greater than zero. Though non-SR-IOV slots are more and more rare, we’ve had to move some for that reason . Seems to be primarily for IBM I we had to move to SR-IOV slots. Some of it isn’t even swapping cards/slots, some is just a pure move to both a preferred and SR-IOV capable one.
Mismatch adapter microcode
I’ve also had like adapters come with different levels of microcode. Overall that one is rare, and could simply just be some from different batches. I’ve only hit that once in the last year or so. But would be nice if they were uniform/checked/the same from the factory. Maybe make real use of that otherwise service partition.
Quality Control
I have encountered some odd QC stuff. For instance the R logo stamped on front latch of the E1050 upside down. One of three was this way. There is only one way they go on so not even I can put it on upside down. But just looks very lackluster. So don’t stare at it after it’s installed.
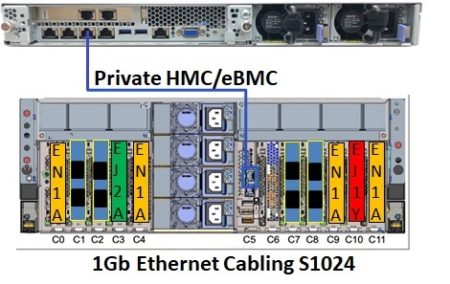
Which HMC port comes factory covered with a tab varies. This is definitely not a technical problem but still just an odd example of differences. I only noticed because I was having a connection problem to one. I pulled the IP off the panel, hard wired in and couldn’t communicate with it. For some, embarrassingly enough, 10 minutes later notice I wasn’t plugged into the HMC1 port at all it was still covered. But on the other two systems the HMC2 port was covered. I actually do run into this one quite a bit. Because once it happened I made a mental note to always look now. For dual HMCs I take the tab off anyway, so it doesn’t matter, but that’s less maybe 20% of the time I have dual HMCs. So If I tell someone else to cable the free/open/uncovered port, they can be unintentionally mismatched.
Missing all four of the main tiny screws from the HMC kit for rail attachment to the HMC. They are unique and not plentiful to find more from other device kits. We weren’t missing one, but all. In my case we had dual HMCs so I took half the screws from the other HMC kit and it was fine.
Historically problems with the kits, factory configurations, hardware are extremely few and far between. I believe in the last year I’ve hit more than usual. Nothing awful, show stopping issues. But it does delay things from progressing.


 Upon connecting, the HMC DHCP server successfully assigned an IP address. The output shown below is after initial connection. Notice, which actually took me a minute to get my attention, that the numbers on the end are the DHCP IP address it was assigned.